Building a web-based product is not just a skill anymore; it’s a necessity, for anything and everything that requires public attention.
A decade into the digital revolution, we are finally witnessing a tectonic shift in users’ behavior towards consumer products, wherein a majority of these products are either web-applications or mobile-applications.
A web/mobile app is usually a culmination of many components working in unison. One of the most overlooked, but significant part is user authentication. Believe me, when I say this, 70% of users leave the platform if they aren’t satisfied with the on-boarding experience.
It HAS to be Smooth & Simple.
There are countless tutorials out there exhibiting code of how authentication in angular works, some even go the extra mile to explain how the code runs, but the only issue with such codes (for rookies) is the flowery words and jargon they use, which can be quite troublesome for someone who is just starting-out in the domain.
The following is a detailed, yet simple guide on how authentication works in angular. The code for the same could be found here. The following code is well commented so that you understand what is actually happening!
This tutorial is not a step by step guide to authentication with angular. The Internet is already swarming with thousands of them, but what’s missing is a detailed explanation of the working of those steps.
How to Authenticate Angular using JWT
It is recommended that you clone the project hereand go through this tutorial while referencing the code. It will give you the clarity you are yearning for…
Before we start with the “coding” section, we need to understand the basic concept behind authentication and JSON Web Tokens (or JWT as millennials call it).
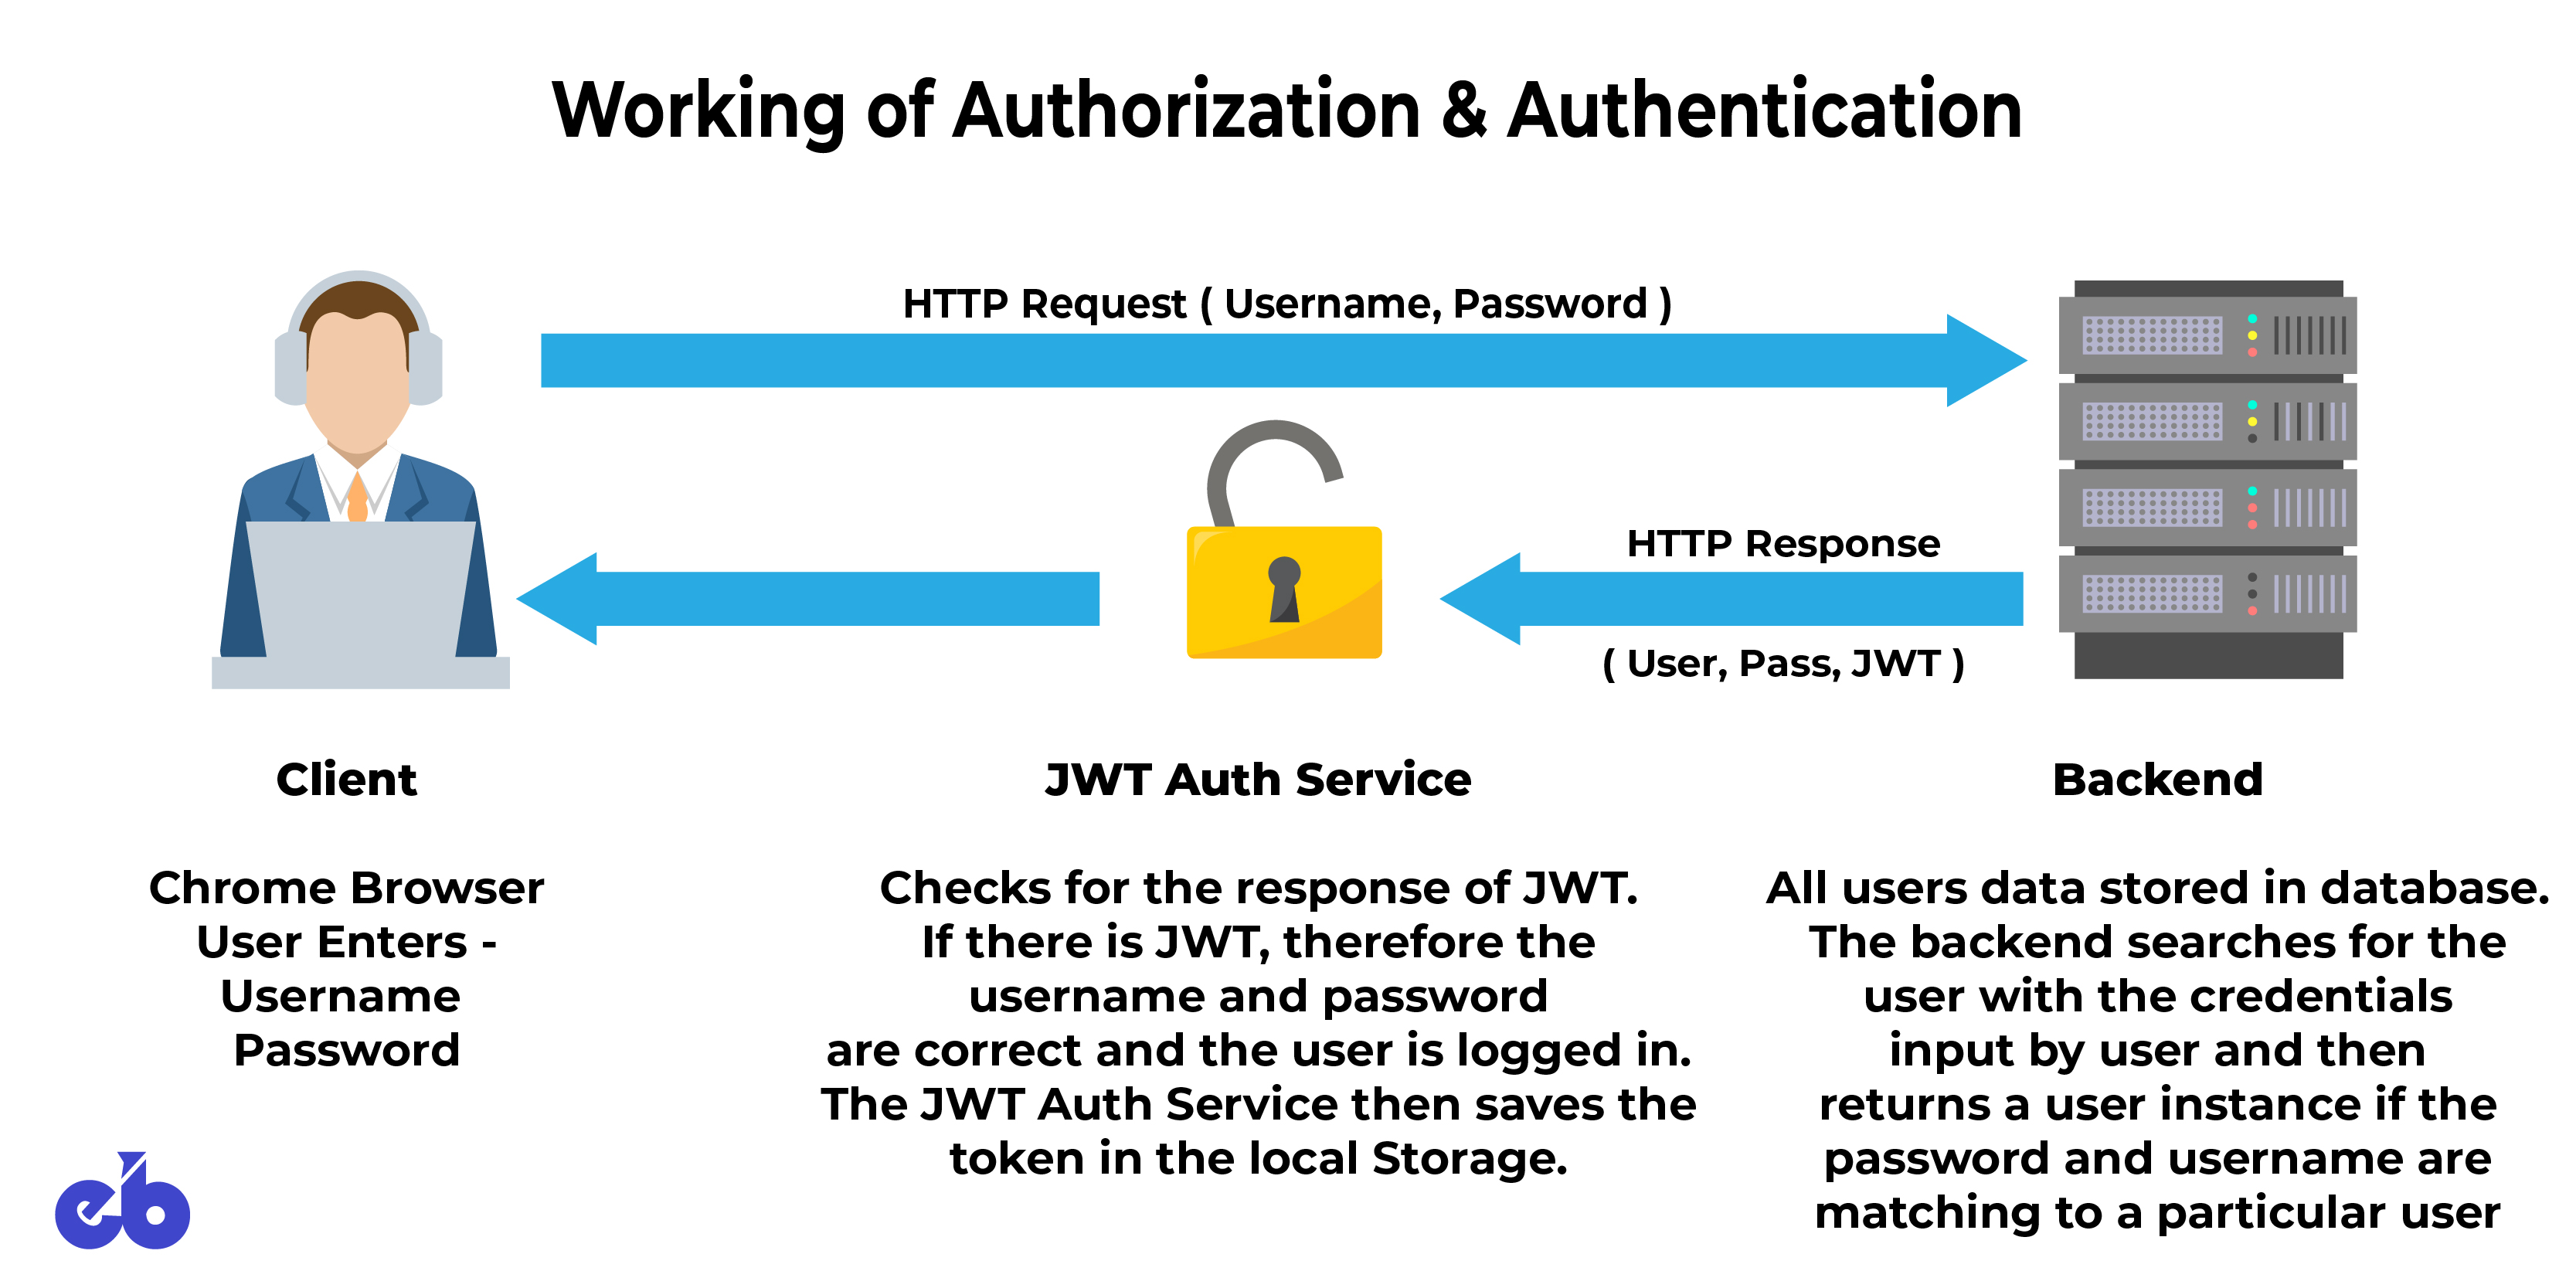
Authentication is a means of verifying the identity of a user, which means if the user is allowed to access the application or not. The two most prevalent ways a user can get authenticated is either through social login (Google+/Facebook login) or through a registered username (can be an email) and password. We will be using the latter to understand the inner workings of authentication in angular.
Recommended Read: A Detailed Guide to CSS Animations and Transitions
The codebase for this tutorial works on the following components:
- JSON Web Token
- Client + localStorage
- Backend + Secure API Endpoints + DB
- Authentication Service
- User Service
- JWT Interceptor
- Auth Guard
- Error Interceptor
After understanding the 8 elements mentioned above, you will not only learn about the workings of JWT and authentication but will also be able to appreciate the process behind it.
- JSON Web Tokens (JWT)
JSON Web Tokens, if defined abstractly, is a JSON object which helps in exchanging information between two or more parties securely. In layman terms, it’s a type of validation token from the authentication server, which indicates that the username and password supplied by the user at the time of logging in whether it is correct or not, and thus the user is “authenticated”.
Read more about JWT and its intricacies right here.
- Client + localStorage
The client here is the user operating on a browser (Google Chrome/Firefox/Opera/Safari). For every registered user, there is a set of username and password stored in the database at the backend.
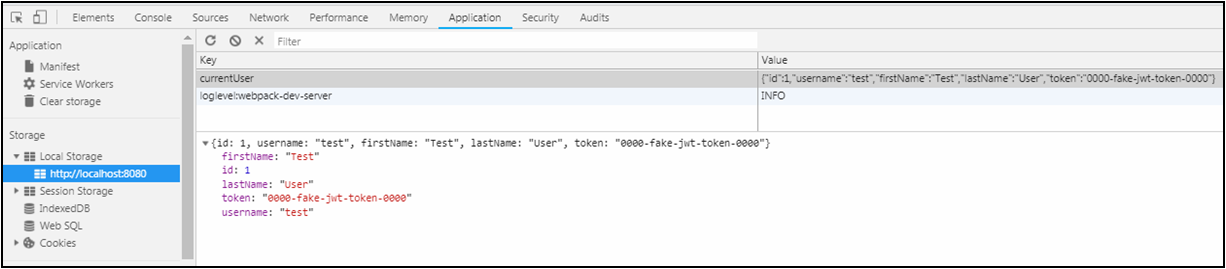
The two most important types of storage properties of any browser are the localStorage and the sessionStorage; they allow you to store key-value pairs in the browser.
- localStorage
It is a persistent storage option when you don’t want the user to be logged out on refresh or closing of a browser tab. The localStorage stores the data without expiration date by default. It is a read-only property. - sessionStorage
As the name indicates, it stores data for a particular session only. It is less persistent, and the user data gets lost on the closing of the browser tab or refreshing.
We will be using localStorage in our case.
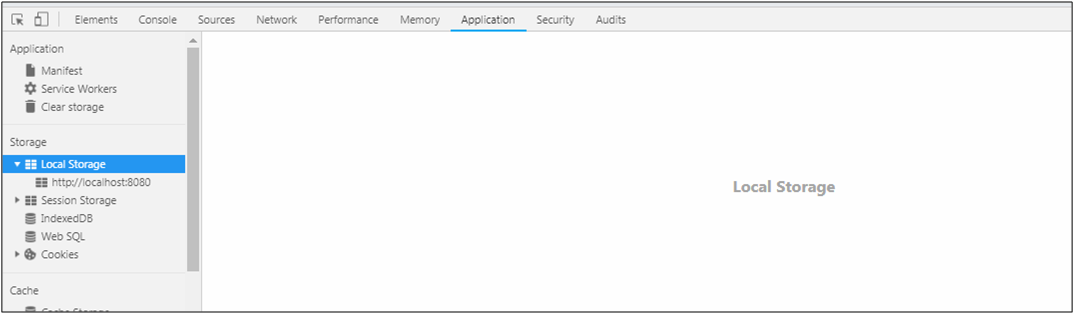
NOTE: One can find localStorage in the developer console (F12 on Chrome) under the “Application” tab.
- Backend + Secure API Endpoints + DB
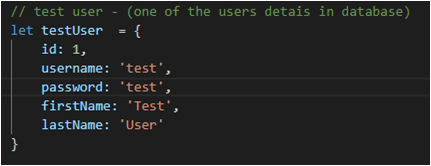
The backend for this tutorial is a fake backend as we just want to understand how things are working on the front-end part. But this backend works as any real backend wherein it has API’s that provide us with a response body and response status. The fake-backend.ts also has test data (DB) for a test user. The credentials input by the user will be validated against this test data.
Test Data:
 The fake-backend will serve as a standalone backend with a delayed response so that it can imitate a real backend. The two major tasks it will perform are:
- It will check the user credentials that come from “Authentication Service” during login
- It will also work as a fake database keeping the user details (hitting a secure API end-point). The user can request for the user details only when the requests have valid JWT Token in its request authorization header
The two API’s that our current backend has are:
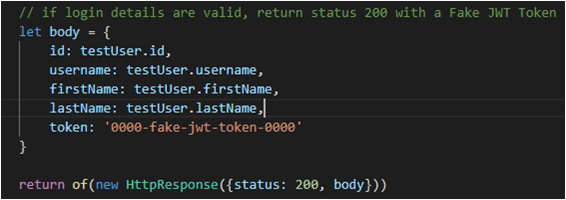
- To check credentials – /users/authenticate
If the user credentials match the test user stored data, the backend sends a response body with a JWT token.
fake-backend.ts
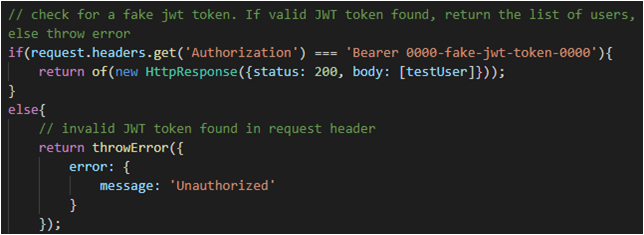
- To give back user details – /users
This is a SECURE API endpoint. By secure, it means that to access this API endpoint, the request must have a valid JWT Token with it. This token is in the request header with the “Authorization: Bearer JWT-TOKEN” property.It first checks for a valid JWT token and then it responds accordingly.
fake-backend.ts
- Authentication Service
Authentication service is used to LOG IN and LOG OUT from the application. It possesses the credentials (username and password) from the client (user/browser) to the backend and checks for the response, if it has JWT token.
If the response from the backend has a JWT token, then the authentication was successful. On successful authentication, the user details are stored in the local storage along with JWT token.
- User Service
The user service is a service dedicated to hitting the 2nd API (the secure API end-point) to fetch the data for all the users present in the database. Currently, only a single user is present – test user. This User Service is accessed via the home component as soon as the user logs in and the home component is initialized.
- home.component.ts
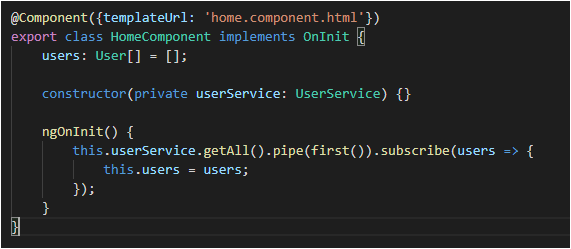
The service will get the response from the backend only if the backend receives the request along with a valid JWT token.
- user.service.ts
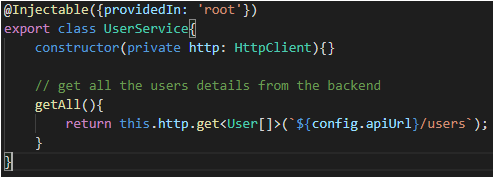
The token is not sent when the request by the client is made. Here is when JWT Interceptor comes to rescue!
- JWT Interceptor
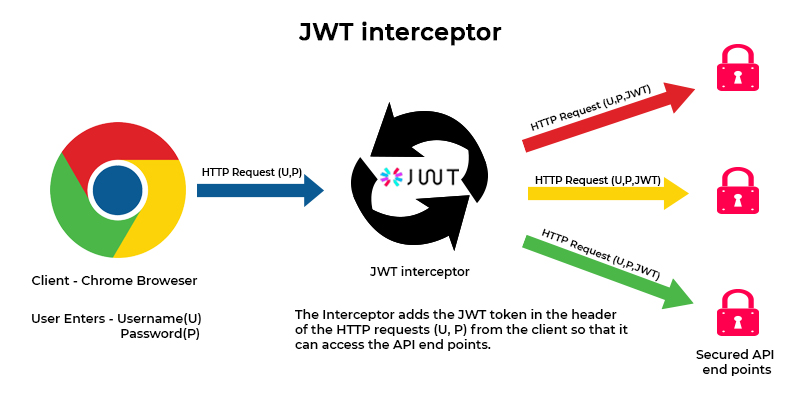
The JWT interceptor intercepts the incoming requests from the application/user and adds JWT token to the request’s Authorization header, only if the user is logged in (because then the JWT token will be present in the localStorage at client’s end).
The JWT interceptor works very smarty by not modifying the original request made by the user service, but cloning the request and adding the JWT token to the request header and then forwarding the cloned request to the backend. The value of the token is fetched from the client’s localStorage. If the user is logged out, there will be no JWT token in the localStorage, and thus, the user won’t be able to access the secured API endpoint.
jwt.interceptor.ts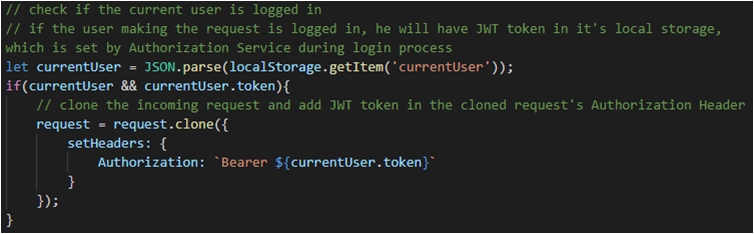
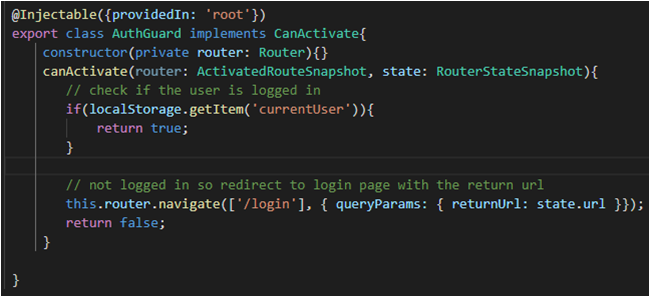
- Auth Guard The Auth Guard works as umm – a Guard!
The auth guard ensures that only authenticated users access specific routes in the application. The auth guard implements an interface called CanActivate with the help of which it returns either true or false.
True If the user is logged in, i.e. the localStorage has current users’ details along with a valid JWT token
False If the user is logged out, i.e. the localStorage lacks the current user details along with a valid JWT token, and in turn, will then redirect the user to the login page.
auth.guard.ts
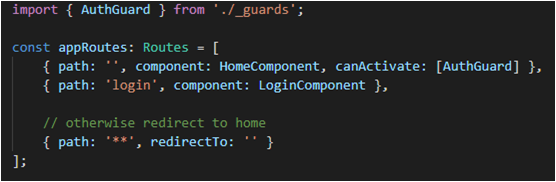
In this particular example, we are using the presence of the current user detail as a way to give rights to access one specific route, i.e. ‘/’ (root), or the HomeComponent. There can be other conditions too like role-based authentication. The rights to access particular routes will then be allocated on the basis of the role of a specific user. The user will be able to access the admin route (say) only if he is an admin.
Even though it is developed in a separate file auth.guard.ts, but it is implemented in the routing of the application, with the canActivate parameter.
app.routing.ts
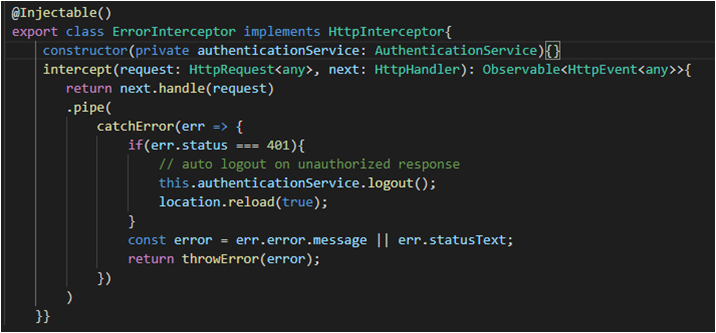
- Error Interceptor
The HTTP error interceptor works with the calling service and the API’s
It intercepts the responses from the API and checks for the status codes (if there were any errors).
Error Status
- 200: Success
- 401: Unauthorized Response – the user will be automatically logged out
All other errors are RE-THROWN, to be caught by the calling service so an alert can be displayed by the user service/component on the client’s end.
error.interceptor.ts
Wrapping Up
The thing about angular (or any framework) is – The more you work with it, the more you’ll discover what all you don’t know. The lack of knowledge about fundamentals will prove to be a hindrance and in turn, will slow down the development process. This is my effort to make one of the components of a web-app development process, i.e. Authentication – EASY!
We hope you found this post valuable. In case you have any doubts, let us know in the comments below.
Recommended Read:
- A Detailed Guide to CSS Animations and Transitions
- Largest eCommerce Companies in the World
- Roles and Responsibilities of a Business Analyst
- How to Start an eCommerce Business
- How Can AI Help Small Businesses?