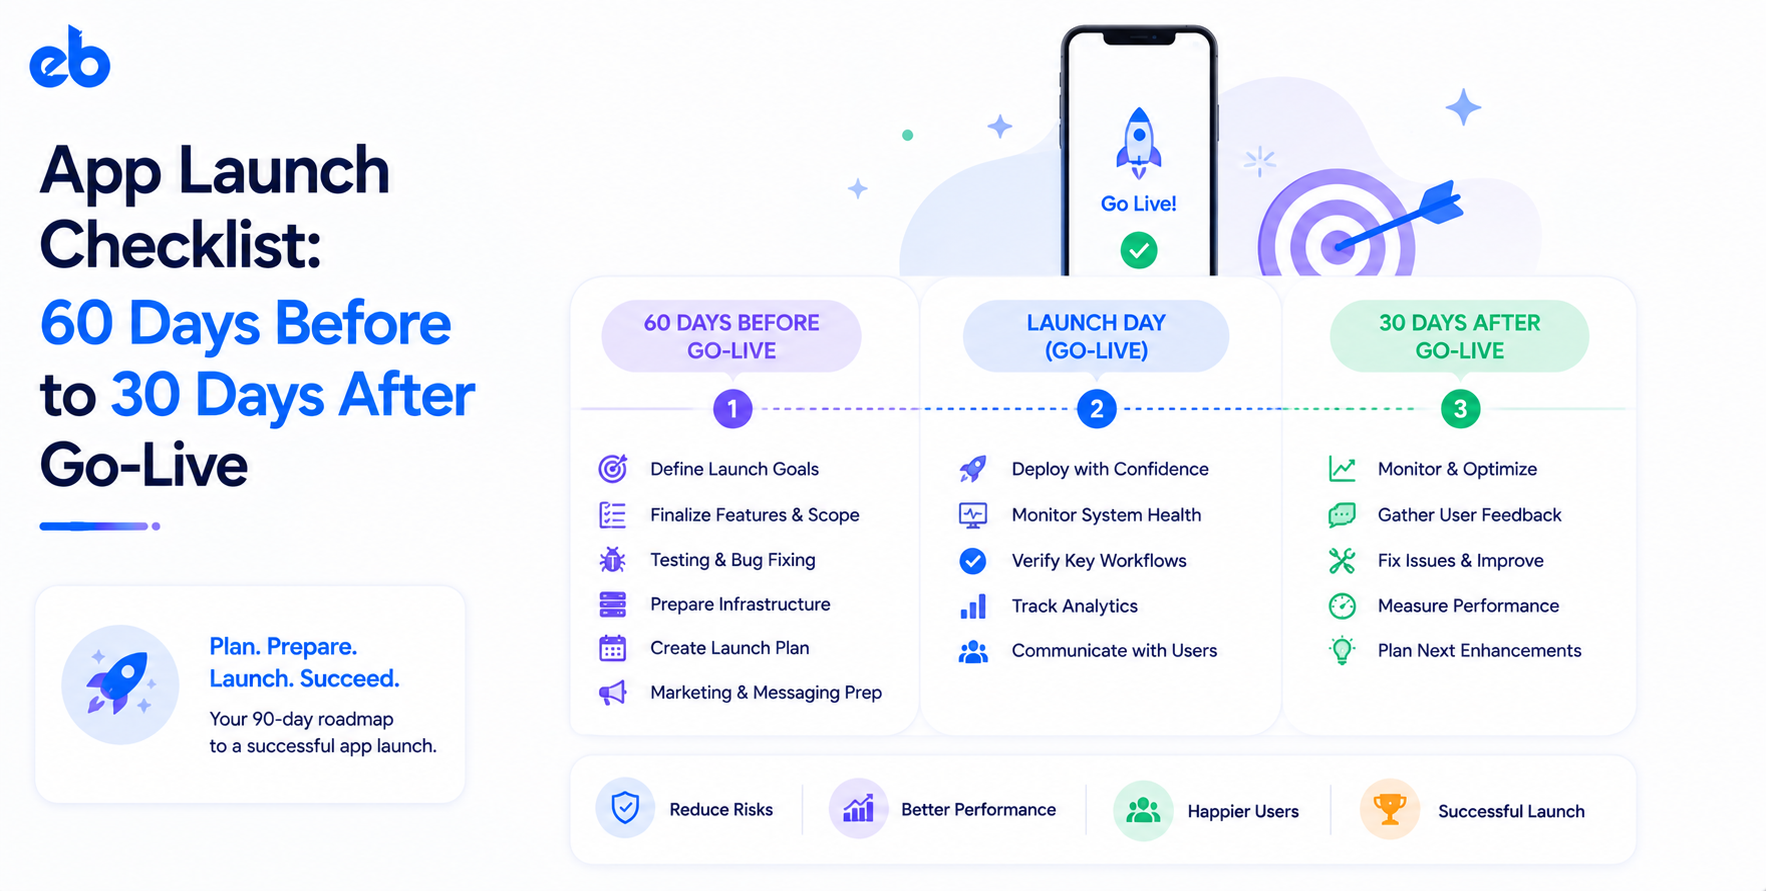
App Launch Checklist: 60 Days Before to 30 Days After Go-Live


Create engaging, high-performance mobile applications tailored to your business needs. We craft future-ready apps that offer smooth user experiences on all devices.
Build robust and scalable websites and CMS platforms that help you manage content effortlessly. Our development ensures a seamless digital presence.
Launch secure, feature-rich online stores with intuitive shopping experiences. We build tailored eCommerce platforms designed for growth.
Design captivating games with immersive gameplay and stunning graphics. From concept to launch, we build engaging experiences that players love.
Enhance your customer relationships with customized Salesforce implementations. Drive growth and efficiency with smarter CRM solutions.
Harness artificial intelligence and machine learning to automate workflows and gain actionable insights. Our AI transforms data into smart decisions.
Accelerate your software delivery lifecycle with continuous integration, delivery, and infrastructure automation to boost efficiency.
A product team I worked with shipped a fitness app on a Friday afternoon. The paid campaign was already live. By Saturday morning, signups were climbing and the backend was returning errors on every profile photo save. Nobody had load tested the media upload path.
The fix took nine hours. The one-star reviews took nine months to bury.
Nothing in that story was a coding failure. It was a sequencing failure. A launch is not a single day. It is a ninety-day window that opens long before submission and closes a month after your first real users arrive.
This app launch checklist maps that window with the decisions that actually matter at each stage.
Apple states that on average, 90% of submissions are reviewed in less than 24 hours (Apple App Review). That figure tempts teams to submit two days out. It averages simple metadata edits with brand new apps, and first submissions in regulated categories often take much longer.
Build your app launch checklist around the slow case.
This app launch checklist breaks into six phases, and each one has a distinct job.
Work the app launch checklist in order. Every phase depends on the one before it, and skipping ahead is how teams end up debugging in public.
The app launch checklist starts with subtraction. Six weeks out, the most valuable decision you can make is what will not ship in version 1.0.
Pick the three flows that define the product, then declare everything else post-launch. Write the frozen list in a shared doc with names next to each item. Verbal agreements dissolve the moment someone’s stakeholder asks for one more screen.
Teams shipping a first version through MVP development usually cut hardest here, and they launch on time because of it. Anything added after this point needs a written trade: one feature in, one feature out. That single rule protects your date better than any project plan.
You cannot add analytics retroactively to launch week. Define your event schema now: install, onboarding start, onboarding complete, activation, first key action, and every error state.
Name events consistently and version the schema. Send test events through to your dashboard and confirm each one lands correctly. Then build the actual launch dashboard while nothing is on fire, with retention, crash-free rate, and funnel drop-off on a single screen. If you cannot answer “where are users quitting” in ten seconds, the instrumentation is not finished.
App store listings need screenshots, a preview video, a description, keywords, and a privacy nutrition label. Each one takes longer than expected, and screenshots usually need a design pass after the UI settles. A quick GIF maker can also help turn app footage into shareable teasers for social channels ahead of launch.
Start drafting at day 60 and lock at day 20. Write the first two lines of the description as the pitch, since that is all most users read before deciding. Localize metadata for every market where you plan to advertise, because a translated listing lifts conversion more than a translated app.
Boring is the goal for this stretch of the app launch checklist. Anything clever in your release process becomes a liability at 2 AM on launch night.
Model realistic traffic instead of a flat number. Signup, login, and media upload spike together on day one. Run the test at three times your expected peak and watch database connections, not just response times.
Fix the slowest query before you scale the servers, because horizontal scaling hides bad queries until it cannot. If your product depends on third-party services, confirm the rate limits on those API development integrations and build graceful degradation for each. Set up autoscaling rules and test that they trigger under real load.
Install crash reporting on both platforms and confirm it captures symbolicated stack traces from a release build, not just debug builds. Add structured logging with request IDs so you can trace a single user’s session end to end.
Then define alert thresholds and route them to a phone, not an inbox. Crash-free sessions under 99%, error rate above 1%, and payment failures above baseline should all wake somebody up. Test each alert by triggering it deliberately. An untested alert is a decoration.
Data privacy disclosures, terms of service, refund policy, and age rating all need sign-off before submission. Apps handling money, health data, or minors get slower review and stricter scrutiny.
Regulated products built with a fintech app development company should also prepare KYC documentation and licensing evidence in advance, since reviewers ask for it directly. Confirm your privacy policy URL is live and matches what the app actually collects. A mismatch between the two is one of the most common rejection reasons.
Your team tests on new devices, strong Wi-Fi, and full batteries. Your users will not, so this part of the app launch checklist assumes the worst conditions.
Recruit 100 to 300 external testers through TestFlight and Google Play internal testing. Friends and colleagues will be polite, so recruit strangers who match your target user.
Give testers specific missions rather than open exploration. Ask them to complete onboarding, then report where they hesitated. Track completion rates per step instead of collecting opinions.
A beta that produces a clean funnel chart is worth more than fifty enthusiastic messages. Run it for at least two weeks so you catch second-session behavior, which is where retention problems first show up.
Build a matrix of the five most common devices in your target market, plus the oldest OS version you support. Include one low-memory Android device, because that is where crashes concentrate.
Then test on throttled 3G, on airplane mode mid-transaction, and while switching from Wi-Fi to cellular. Confirm the app recovers from an interrupted payment without double charging. Deep links, push notifications, and permission prompts all need testing on fresh installs, since they behave differently after an upgrade.
Agree now on what blocks a release. A useful split is three tiers: blockers stop the launch, majors ship with a known workaround, and minors go to the backlog.
Write examples for each tier so nobody argues definitions during crunch week. Assign one person the final call on borderline bugs. Teams without this rule either delay indefinitely over cosmetic issues or ship a payment bug because everyone assumed somebody else flagged it.
The last two weeks of an app launch checklist are about timing, not building. Code freeze belongs at day 10.
Submit your build at day 10 to 14 with manual release enabled. Approval and publishing are separate events, so getting approved early costs nothing and buys you a rejection buffer.
If you are rejected, you still have a week to fix and resubmit. Plan for at least one rejection on a first submission. Prepare a reviewer note explaining any unusual permission, and include demo credentials for anything behind a login. Missing test credentials is an avoidable rejection that costs several days.
Write help center articles for the ten questions you already know are coming: password reset, payment failures, account deletion, and permission prompts.
Set up the support inbox, canned responses, and an escalation path to engineering. Assign someone to monitor app store reviews daily during launch week, since a fast public reply visibly changes rating trajectory. Teams running a broad mobile app development launch across both platforms should staff support for both stores separately, because the review cultures differ.
Do not send the announcement email while a phased rollout sits at 10%. Marketing goes live only after the build is publicly available on both stores and the first metrics look clean.
Stage the sequence: existing users first, then owned channels, then paid. Give yourself a 24-hour gap between the soft release and the loud one. Prepare the rollback message too, so if you pause the release you are not writing crisis copy under pressure.
Launch day work is observation, not deployment. This part of the app launch checklist is a watch list, and roles get assigned before the morning starts.
If crash-free sessions drop below 99%, halt the rollout before you investigate. Pausing is cheap. Recovering a rating is not.
The app launch checklist does not end at publication. Week one exists to separate real problems from noise, so resist the urge to react to individual reviews.
Track four numbers daily: crash-free rate, day-one retention, onboarding completion, and activation rate. Compare them against beta results. A gap between beta and production usually points to a device, network, or scale issue rather than a design flaw.
Ship one hotfix release around day three, batching every verified crash fix into a single build. Multiple emergency releases in one week signal instability to the stores and exhaust your team. Reply to every negative review with a specific answer and a version number when the fix lands. Users update their ratings more often than most teams expect.
Now the app launch checklist shifts from defense to learning. By day eight you have enough data to see patterns instead of incidents.
Pull your funnel and find the single largest drop-off step. Fix that before anything on the deferred feature list, because a 10% onboarding improvement compounds across every acquisition channel you fund later. Check day-seven retention against your day-one number to see whether the product delivers on its promise.
Review store keyword performance and update metadata at day 21, once you have real search terms. If your roadmap includes personalization or recommendations, this is the point where AI development work becomes useful, since you finally have behavioral data to train against. Close the month with a written retrospective covering what the app launch checklist caught and what it missed.
Most app launch checklist failures are scheduling decisions rather than engineering ones. The same five show up repeatedly.
Every item on that list costs days to prevent and weeks to fix.
A good app launch checklist does not guarantee a successful product. It guarantees that failure is informative rather than embarrassing. When something breaks, you know within minutes, you know which build caused it, and you can roll back before the reviews land.
The teams that launch calmly are not lucky. They ran the app launch checklist early, while every decision on it was still cheap to make.
If you are scoping a build and comparing mobile app development companies, walk them through your app launch checklist and ask how they handle staged rollouts and post-launch monitoring. The answer tells you more than any portfolio.
Build, test, launch, and scale with a development team that treats post-launch stability as seriously as the code itself. EngineerBabu helps businesses take mobile apps from development to production with structured testing, staged rollouts, performance monitoring, and ongoing support.
Planning your next app?
Talk to EngineerBabu and build a launch plan that’s ready for the real world.
A complete app launch checklist covers scope freeze, analytics instrumentation, load testing, crash reporting, beta testing, store metadata, compliance review, staged rollout, support readiness, and 30 days of post-launch monitoring.
Submit 10 to 14 days before your announcement with manual release enabled. Your app launch checklist should treat approval and public release as separate steps, which gives you room for one rejection without moving the date.
Crash-free session rate, onboarding completion, day-one retention, and day-seven retention. Downloads tell you whether marketing worked. The post-launch half of the app launch checklist exists to tell you whether the product did.
Only if you can staff support and incident response for both. Many teams release on one platform first, stabilize for a week, then repeat the app launch checklist for the second platform.
A staged rollout releases your app to a small percentage of users first, then expands. Yes, use one. It is the cheapest way to catch a serious defect before it reaches your whole audience.